Using AWS Dynamoose in a Lambda Function
AWS DynamoDB and Lambda Functions
In this post, we will make a Lambda Function that interfaces with DynamoDB in AWS. To follow along, you will need an AWS account and have the aws-cli installed. We’ll also use node and npm as our environment.
Setting up DynamoDb
In the DynamoDB AWS Console, create a New Table. I will call my table cityZoo. Give it a partition key. I’ll use id as type string.
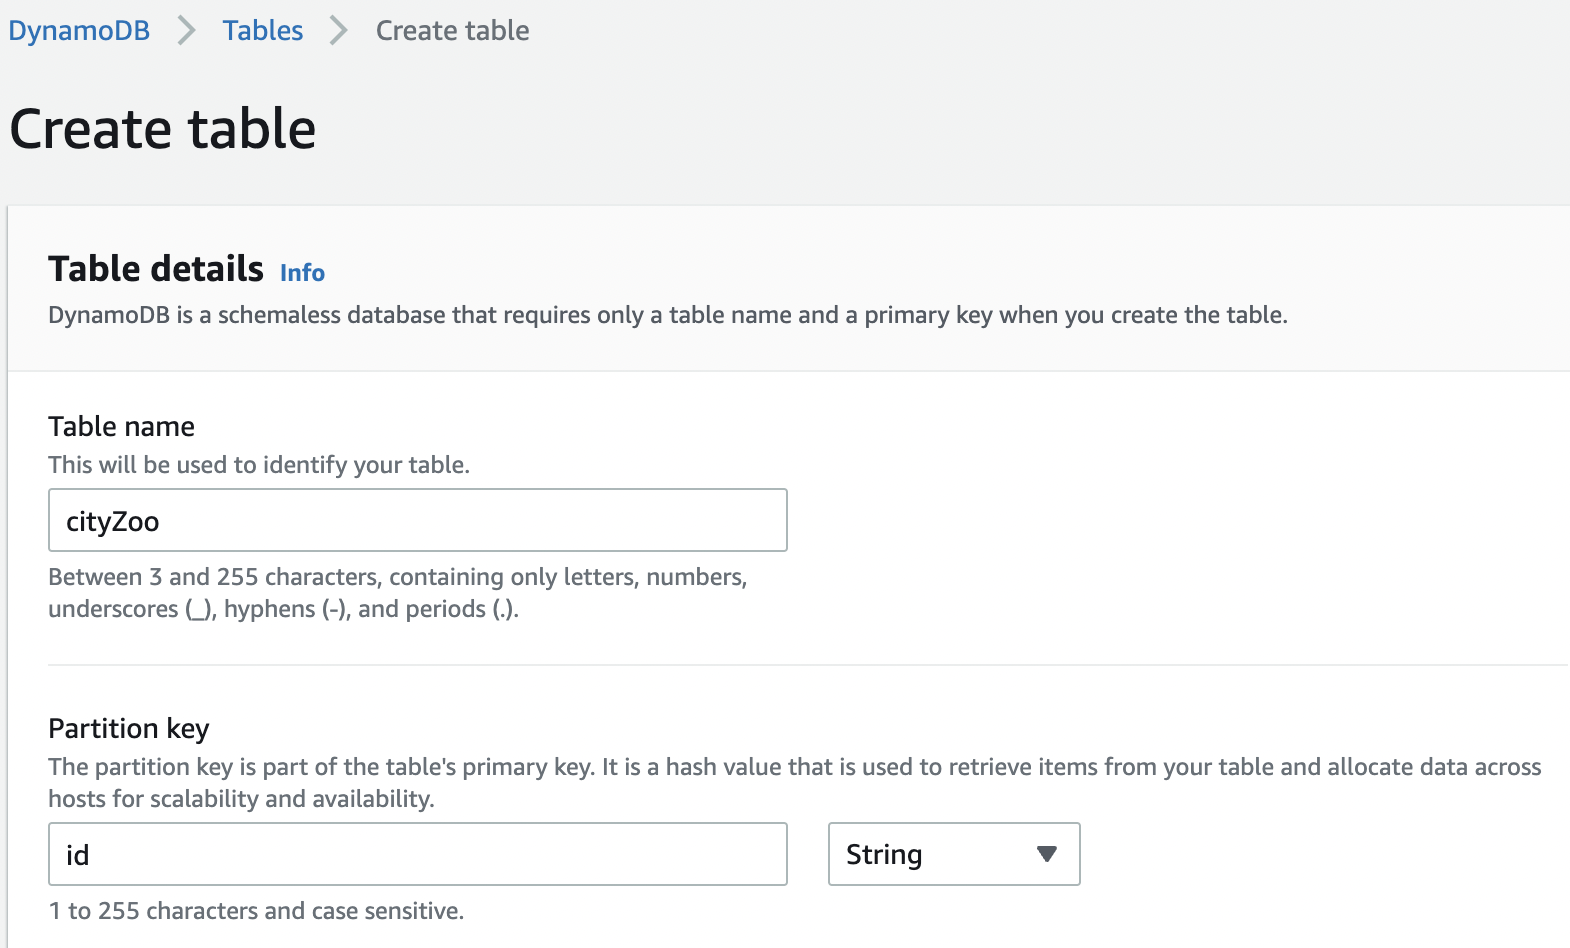 A screenshot of creating a creating a DynamoDB table with AWS console
Creating a Function and Setting up a Role for you Lambda Functions
In the AWS console, click on Create Function. We will write one from scratch, so you can click the Author from scratch button.
I’ll call my function addToCityZoo.
We will need extra permissions to access DynamoDB, so we will create a new role with the right permissions.
To set the role, scroll down on the same page and click on Change default execution role to see the options.
We will click on Create a new role from AWS policy templates.
Now choose click on Policy templates and search for DynamoDb Microservice. (The exact name of the policy template can change over time!)
This will give us the permissions to perform CRUD operations in a DynamoDB database. Now you can click Create Function Once you have made one Role like this, you can re-use the same Role for other Lambda Functions you create.
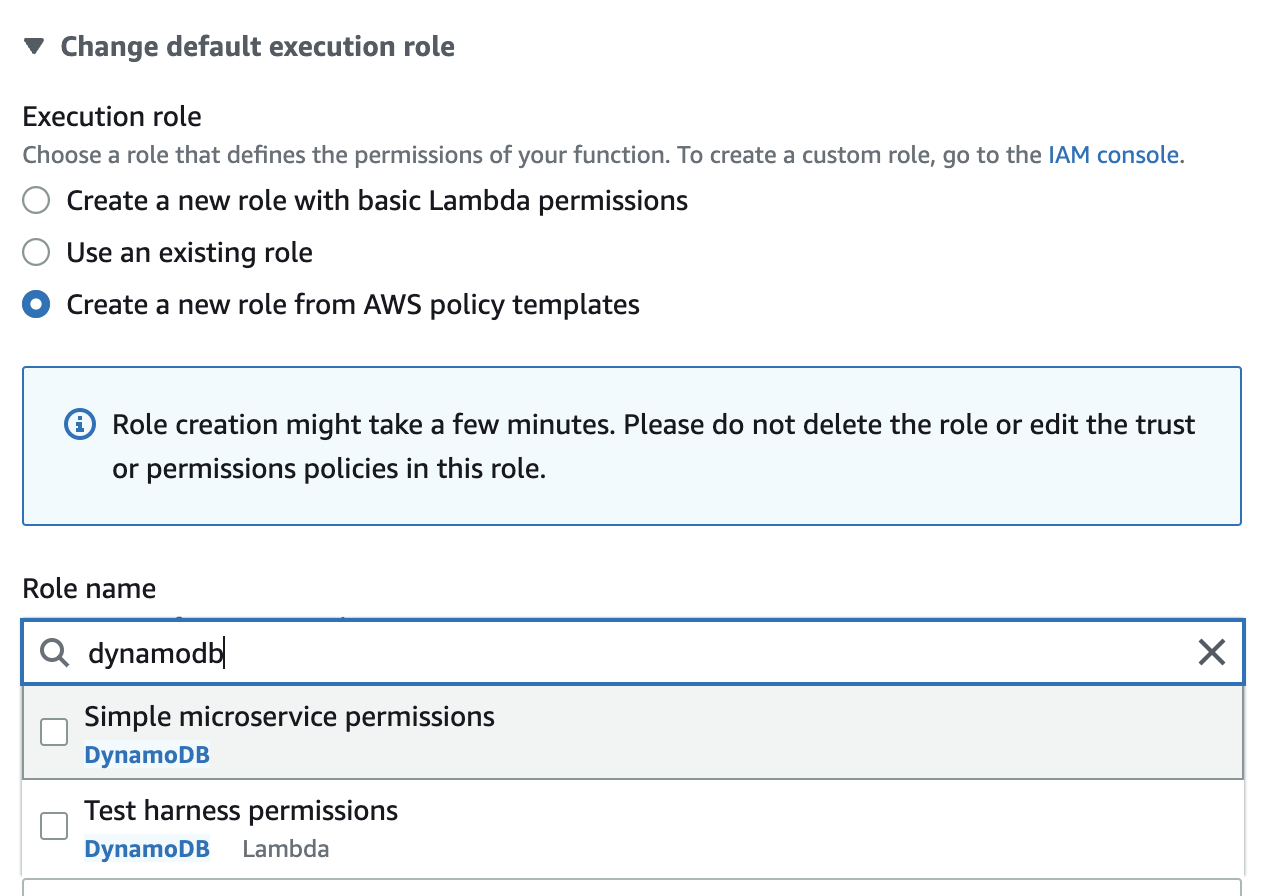 A screenshot of setting permissions for your Role
Writing a Lambda Function
Now it is time to write a function in JavaScript to perform actions on the database. There I will write them locally and upload them. AWS has a simple web based IDE, but you can’t install npm modules there. So, we will need to upload our function and the node_modules directory as a zip file if we have dependencies. But after you have uploaded the node_modules once, you *CAN* use the online IDE to edit if you wish.
Here is a simple function to get started.
// index.js
const handler = async(event) => {
  // TODO implement
  const response = {
    statusCode: 200,
    body: JSON.stringify('Hello, from the City Zoo!'),
  };
  return response;
};

module.exports = { handler };
Uploading our function
To upload using aws-cli, you need to zip the files first, then update the function. For more details from the docs, see here.
Here are the three commands I use. The file local file should be named index.js (or index.mjs if you are using es6 import syntax). And I am using addToCityZoo as the Lambda Function’s name in the cloud.
# remove the old zip file if you have created one already
$ rm lambda.zip

# zip the current dir (except for the lambda.zip file)
$ zip -r lambda.zip . -x lambda.zip

# use aws-cli to upload to addToCityZoo
$ aws lambda update-function-code --function-name addToCityZoo --zip-file fileb://lambda.zip
(You may have to specify the region or set up local permissions before you can upload using aws-cli.)
So, each time you update, you will have to run these three commands. Ideally, this would be put into a script.
You could also install aws-sam and follow the tutorial on how to create and upload Lambda Functions. There are even AWS extensions for VSCode and many other IDEs.
Invoking the function
We can test the function from the AWS Console, but we can also test it with the aws-cli. For more details read the documentation here.
$ aws lambda invoke --function-name addTocityZoo --invocation-type RequestResponse lambda-results.txt

$ cat lambda-results.txt
{"statusCode":200,"body":"\"Hello, from the City Zoo!\""}
Creating your model
We will use Dynamoose to access DynamoDB.
npm install dynamoose
First, let’s set up a model for our zoo. One thing to remember is to tell Dynamoose not to create your tables when it called in the Lambda Function. Our permissions don’t allow for creating a table, and you will get an error if you attempt to create a new table from within the Lambda Function. (Remember, we’ve already created the table using the AWS Console.) For this, you can use a config object with create set to false.
// animal.js
const dynamoose = require("dynamoose");

// Define our schema
const animalSchema = new dynamoose.Schema({
    id: String,
    name: String,
    species: String
});

// don't attempt to create a table in DynamoDb
const configObj = {
  create: false,
  update: false,
  waitForActive: false
};

// Initialize our model
const AnimalModel = dynamoose.model("cityZoo",
  animalSchema,
  configObj
);

module.exports = AnimalModel;
Now we can try to access the database. We won’t need a password for the database because the Lambda Function already has permissions from its Role.
// index.js
const AnimalModel = require("./animals");

const handler = async (event) => {

  // Create a model object
  const animal = new AnimalModel({
    id: "croc-1",
    name: "Larry",
    species: "crocodile"
  })

  // Save the model to the database
  const resp = await animal.save();

  // Create an HTTP response object
  const response = {
    statusCode: 200,
    body: JSON.stringify(`Hello from ${resp.name} the ${resp.species}.`)
  };

  return response;
};

module.exports = { handler };
You should get the results:
{"statusCode":200,"body":"\"Hello from Larry the crocodile\""}
And your data should be stored in the table called “cityZoo” in the cloud.
Using a script
You could put it all in a script, if you want.
#!/usr/bin/env zsh
# update-lambda
# This is just an example of a script you could use to update your lambda files
# It zips your JavaScript files and the node_modules directory, excluding some files.
# Then it saves it to the cloud as a Lambda Function called 'addToCityZoo'
# Finally, it runs and save the results to a file called 'lambda-results.txt' and prints it out.

rm lambda.zip

zip -r lambda.zip . -x lambda.zip lambda-results.txt update-lambda

aws lambda update-function-code --function-name addToCityZoo --zip-file fileb://build/lambda.zip

aws lambda invoke --function-name addToCityZoo --invocation-type RequestResponse lambda-results.txt

cat lambda-results.txt
You can visit this GitHub repo (see the branch minimal-dynamodb) for a working example of the code in this post.
In my next post, I’ll describe how to trigger this Lambda Function with a web request using AWS API Gateway.
Thanks for reading!